How to Transfer Domain Names to Google Cloud Hosting

How to Transfer Domain Names to Google Cloud Hosting


One of the final steps before deploying your WordPress website on Google Cloud Platform is setting up a domain name.
With most hosting providers (such as SiteGround or BlueHost), setting up a domain name is relatively easy. However, setting up a domain name on the Google Cloud Platform is slightly more complicated.

Registering a Domain Name

Before starting this tutorial, you should’ve already purchased a domain name. Most .comdomains usually sell for around ten U.S. dollars. However, less commonly used domain names, such as those ending in .club or .site, sell for much cheaper. To register a domain:
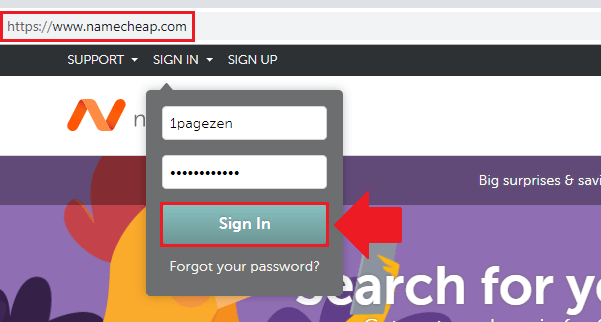
  1. Visit a domain name provider (we recommend NameCheap).
  2. Search for the domain you want to purchase.
  3. Add it to your cart.
  4. Checkout.
Once you’ve registered a domain name and have setup WordPress on Google Cloud (Click-to-Deploy or Bitnami), you’re ready to start this tutorial.

There are 4 steps in this tutorial:

Additional Steps for WordPress:

1. Enable the Cloud DNS API

login to google cloud platform and go to your api manager dashboard transfer wordpress domain google cloud platform
Login to your Google Cloud Platform account. Click the hamburger menu in the upper left-hand corner of the screen and go to API Manager > Dashboard.
after reaching your api dashboard click enable api at the top of the screen transfer wordpress domain to google cloud hosting
Once you’ve reached your API Dashboard, click on “ENABLE API” at the top of the screen.
search for cloud dns and then enable the cloud dns api on the next page
In the search field, search for “cloud dns”, and click on “Google Cloud DNS API”. After you’ve clicked on “Google Cloud DNS API”, click enable.

2. Create a Cloud DNS Zone

click on the hamburger menu in the upper-left hand corner of the screen an navigate to networking then cloud dns transfer wordpress domain name to google cloud hosting
After enabling the Cloud DNS API, click on the hamburger menu in the upper left hand corner of the screen and navigate to Networking > Cloud DNS.
once you've navigated to cloud dns click create zone at the top of the page wordpress domain name google cloud hosting
Once you’ve navigated to Cloud DNS, click on “CREATE ZONE” at the top of the page.
i will be configuring the domain name eborchids.com so in the zone name field i will enter eborchids and in the dns field i will enter eborchids.com
Enter the name of your website in the Zone Name field, and your website’s root domain name in the DNS Name field. Click the “Create” button.

3. Add DNS Records

after creating your zone click on the add record set link that appears on the next page
After you’ve created your zone, click on the “ADD RECORD SET” link that appears on the next page.
add an a record as record type and your ipv4 address in the field below transfer wordpress domain to google cloud
The first record you’ll create is an “A” record. In the Resource Record Type field, select “A”. In the IPv4 Address field, enter your IPv4 address (instructions for finding your IPv4 address in next image).
find your ipv4 address by going to compute engine then vm instances then external ip transfer wordpress domain name to google cloud hosting
You can locate your IPv4 address by clicking on the hamburger menu in the upper left-hand corner of the screen, and navigating to Compute Engine > VM Instances > External IP.
cname record configuration transfer wordpress domain name to google cloud hosting
Next, you’re going to create a CNAME record. In the DNS Name field enter “www”. In the Resource Record Type field enter “CNAME”. In the Canonical name field, enter your domain name.

4. Configure NS Records

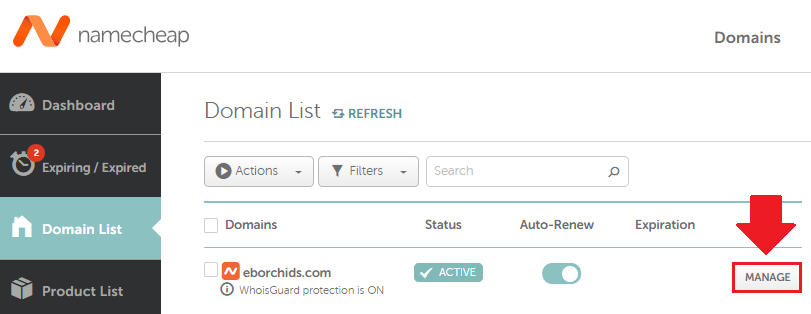
In this section of the tutorial, you will be pointing your domain name to your website on Google Cloud. In this example, NameCheap is used as the domain name provider, however, the process will be the similar for all domain name providers.
four different records are configured: A, CNAME, SOA, and NS
After you’ve configured your “A” and “CNAME” records, you should have a total of 4 record sets. The two record sets in the middle (NS and SOA) are generated automatically. Copy the four NS records.
namecheap domain name provider
Sign-in to the domain name provider where you registered your domain name.
click on the manage button namecheap
Click on the manage button next to your domain name.
nameservers section showing custom dns and four google domain fields transfer wordpress domain to google cloud hosting
In the NAMESERVERS section of the domain management page, choose “Custom DNS”, then paste the four Google NS records.

5. Edit WordPress URLs

5.1. WordPress Bitnami Instructions

Use the following instructions if you’re configuring the Bitnami version of WordPress on Google Cloud. For Click-to-deploy, scroll down to step 5.2.
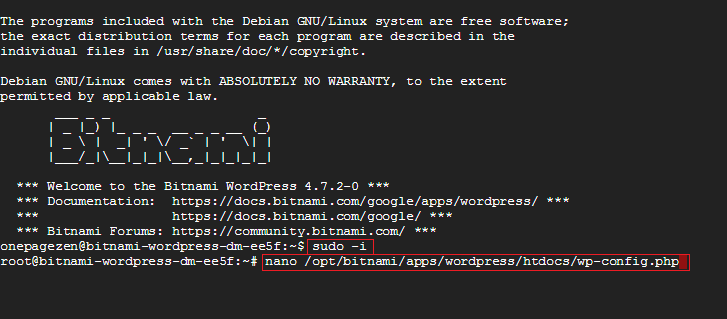
compute engine
From your Google Cloud Platform dashboard navigate to “Compute Engine” > “VM Instances”.
ssh google cloud platform
Once inside of your Compute Engine, click on the SSH button to connect to your WordPress installation.
domain configuration wordpress on google cloud
Once connected via SSH, connect as a root user and open your wp-config.php file in the nano editor.
sudo -i
nano /opt/bitnami/apps/wordpress/htdocs/wp-config.php
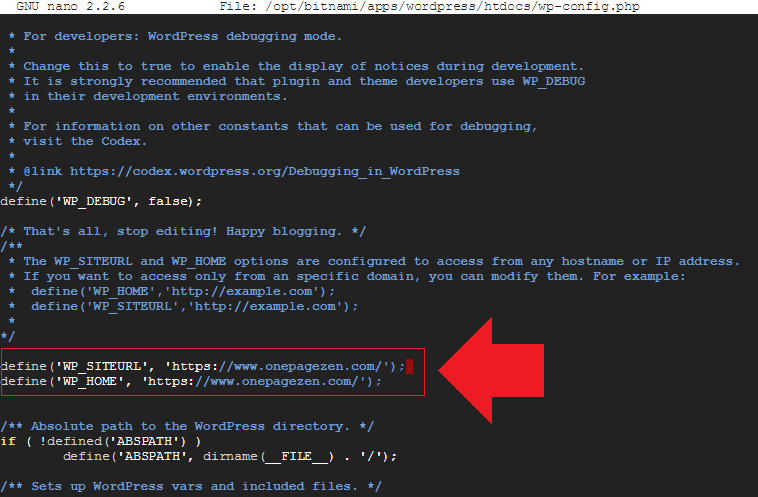
domain configuration wordpress on google cloud
Inside of your wp-config.php file, you will need to replace your SiteURL and HomeURL definitions as shown below.
REPLACE THIS: 

define('WP_SITEURL', 'http://' . $_SERVER['HTTP_HOST'] . '/');
define('WP_HOME', 'http://' . $_SERVER['HTTP_HOST'] . '/');


WITH: 

define('WP_HOME','http://example.com'); 
define('WP_SITEURL','http://example.com');
Remember to replace “example.com” with either the www. or non-www. version of your domain name – whichever your prefer. For example:
define('WP_SITEURL', 'http://www.yourdomain.com/');
define('WP_HOME', 'http://www.yourdomain.com/');
If you’ve already configured SSL for your domain, you should substitute the http:// in the code above for https:// instead. For example:
define('WP_SITEURL', 'https://www.yourdomain.com/');
define('WP_HOME', 'https://www.yourdomain.com/');
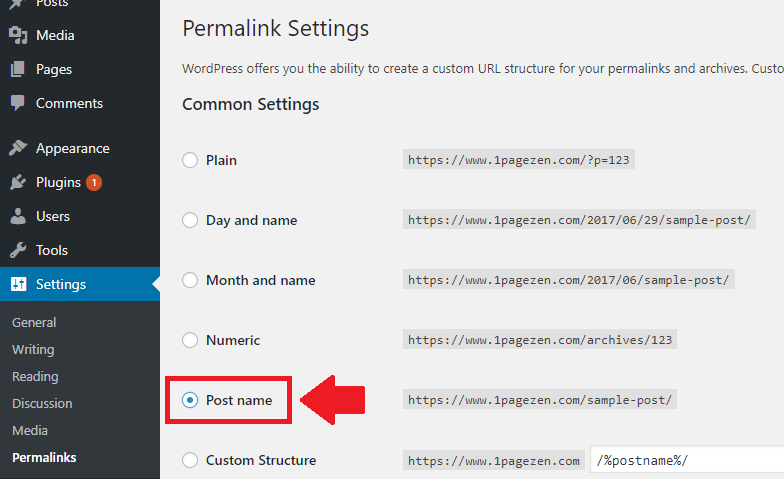
Next, make sure to verify your website’s permalink structure. This setting often gets corrupted after changing your domain name settings. You can access your permalink settings by going to Settings > Permalinks.
change permalink structure
Make sure to verify your permalink structure after changing your domain name settings.

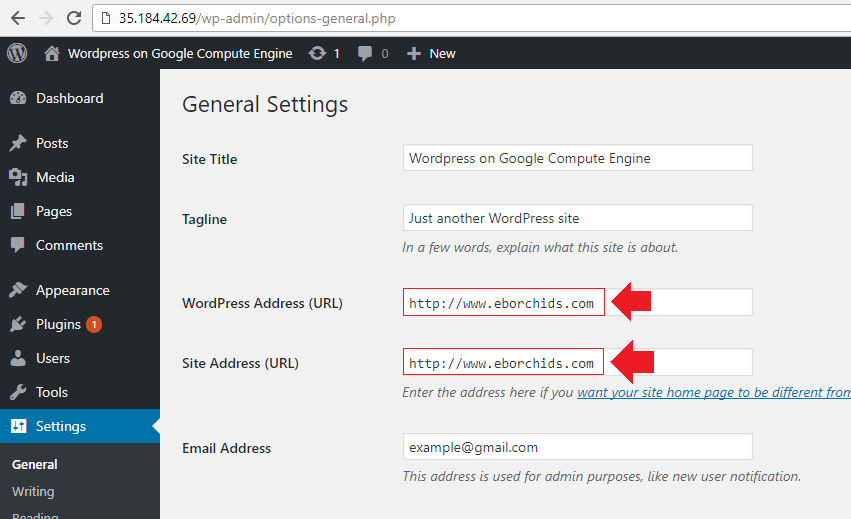
5.2. WordPress Click-to-deploy Instructions

Use the following instructions to configure your WordPress URLs for the Click-to-deployversion of WordPress on Google Cloud.
find your ipv4 address by going to compute engine then vm instances then external ip transfer wordpress domain name to google cloud hosting
Go back to your Compute Engine > VM instances page and copy the IP address connected to your website. Also – make sure that you’ve reserved the IP address as static.
paste wordpress ip address google cloud into web browser url
Paste the IP address into your browser, followed by /wp-admin.
login to wordpress from dashboard
Next, fill in your login credentials to access your WordPress dashboard.
change wordpress urls google cloud platform wordpress
From your WordPress dashboard, navigate to Settings > General. From here, change the URL fields from your IP address to the domain name that you just transferred.

That’s it!

Your domain name is now pointing to your Google Cloud website!
Remember – domain name changes can take up to 48 hours to take effect, but in my experience, they usually take less than 30 minutes.
If you have questions, follow along with the video for clarification.
Otherwise, leave your questions and comments below, and I will respond to them promptly.